

How Tall a Woman Must Be for Her Height to Get Attention

How tall must a woman be before her height generates comments from strangers like “How TALL are you” or criticism for wearing high heels?
Many tall women post negative issues about being tall in various online communities. To qualify as tall, according to the site’s moderator, a woman must be at least 5-10.
I’m shocked at how many women this height report getting comments by strangers when they’re not even in high heels.
Since apparently, many 5-10 tall women get asked “tall” questions or get “tall” remarks, I wonder what slightly shorter women experience.
For all the attention that these 5-10 women report about their height, I have to believe that just one inch shorter doesn’t suddenly eliminate all the questions and comments.
The 5-10 women who post their experiences say they don’t wear heels, so we’re obviously talking about an absolute height of 5-10.
Now, if a teen girl is 5-10, of course this stands out more than a grown woman this height.
But on the tall quotes page, the vast majority of complaints come from 5-10 women, not teenagers (age is given 99.99 percent of the time).
Do 5-9 women ever get asked if they play basketball or how tall their parents are? Are they ever questioned why they wear high heels?
I see very tall women all the time in public, and I’ve watched other nearby people’s faces to see if they’re noticing the height.
I’ve never seen any facial expressions that indicate that these nearby people are taken aback by the height –even when the woman is clearly 6-3 — in sneakers.
I see very tall women walking through clusters of people on the main floor of a health club…yet NO heads turn to stare.
Maybe people who work out don’t notice tallness in women?
To the women who hate all the attention their height brings, just WHERE is this happening?
I’ve never witnessed it, and let me tell you, I’ve seen tons of women at least 5-10, many over six feet — in flats — over the years. Nobody seems to notice.
 Lorra Garrick has been covering medical, fitness and cybersecurity topics for many years, having written thousands of articles for print magazines and websites, including as a ghostwriter. She’s also a former ACE-certified personal trainer.

When Tall Women Get Mistaken for Men

How many tall women get mistaken for men?
If you’re a tall woman who gets mistaken for a man, how do you know it’s because you’re tall? The “tall quotes” page of tallwomen.org ran the following post:
“I have always realized all my life I was much taller than most. I’ve always loved my height up until around the age of 19-20 (I’m 20 now).
I heard a couple people say that I must be a man, or a tranny, and it really took a blow to my self-esteem.
When I go out with guy friends I feel weird because I don’t want anyone to think he’s walking around with a transvestite.”
The woman who posted this is 5-11 and a half tall. It’s one thing when a tall woman is joked at by an insecure man who asks her outright, “Do you ever get mistaken for a man?”
But what I’m referring to, and what the tall woman above is referring to, is being genuinely mistaken for a man.
So here’s a question to tall women who’ve been mistaken for men:
Have YOU ever mistaken a woman for a man? And if so, was that woman necessarily tall? Or were some of those women medium height or, let’s say, below 5-9?
I bet many of those women, whom you’ve mistaken for men were UNDER 5-9. Height has little to do with thinking a woman might be a man.
Another way to look at this is to ask yourself if you’d ever mistake a very short MAN for a woman. Anyone think 6-2 Maria Sharapova might be a man?
Every person whose gender I was not able to identify, has been under 5-7. Height had nothing to do with it.
Multiple other factors, including a combination of mannerisms, clothing and hairstyle, are at play when someone mistakes a very tall woman for a man.
This includes muscle development. There are women at the health club who sport impressive muscles on tattooed arms.
If their hairstyle and attire are androgynous, all of these factors can make the observer wonder about gender–but the point I’m making is that HEIGHT is NOT relevant.
Being very tall, in and of itself, will not make a woman “look like a man.”
For tall woman who are concerned about being mistaken for a man, re-evaluate the following:
1) Body movements, mannerisms, gait.
2) Clothing and hairstyle choices.
And quite honestly, if someone mistakes you for a man–and you still believe it’s because you’re very tall–is this really the worst problem life can throw at you?
Lorra Garrick has been covering medical, fitness and cybersecurity topics for many years, having written thousands of articles for print magazines and websites, including as a ghostwriter. She’s also a former ACE-certified personal trainer.

How to Handle People Who Keep Saying How Tall You Are

“Wow, you’re tall!” If you’re a tall woman, you’ve heard this a million times. People keeping pointing out the obvious: your height.
Are you a very tall woman who hates when people comment about your height?
Do you ever feel tempted to reply, “I ALREADY know I’m tall. Why are you pointing out the obvious?”?
At 5-8, I’m not tall enough to hear anyone tell me, “Gee, you’re tall.”
But how I’d love to hear those words!
The only time someone ever told me, “You’re tall,” was at a grocery store.
An elderly lady couldn’t reach something, noticed me and said, “Excuse me, you’re tall, can you get something on the top shelf for me?”
I wonder how many of these tall women, who hate hearing that they’re “so tall,” are guilty of the very thing that they criticize: pointing out to someone the obvious.
Ask yourself if you’ve ever committed the act yourself of pointing out the obvious to someone — not about their height, but about something else that was blaringly obvious to them, such as:
“Gee, your dog is so big!”
“Wow, your lawn is so green!”
“My goodness, your daughter’s hair is so curly!”
“Wow, your baby’s eyes are so big!”
“Ooooh, what a tiny dog you have!”
“God, your boyfriend has so many tattoos!”
Have you never, never, never made any comments like this to anyone?
Do you ever intentionally fire back what you know is a rude response?
What if the owner of the huge dog clapped back at you after you commented how big their dog was?
Or, what if someone sniped back at you, “My hair is so long?? Thanks for pointing that out; I never noticed!” How would you feel?
Well, that’s what people think of you when you get smart-mouthed just because they tell you you’re tall.
A common complaint is: “Nobody would ever go up to a fat person and say, “You’re fat.”
But this is not a fair comparison, because obesity is regarded as something undesirable, whereas a lot of height is viewed as something positive — even if the person making the observation wouldn’t want to be that tall.
Extra height is commonly envied. Obesity is not.
Right now, how many people do you know who want to be overweight?
Now, how many people do you know who wish they were taller?
Next time someone comments about your height, give them the best, most gracious reply: “Thank you!” Who knows, that person might be envying you like mad.
 Lorra Garrick has been covering medical, fitness and cybersecurity topics for many years, having written thousands of articles for print magazines and websites, including as a ghostwriter. She’s also a former ACE-certified personal trainer.
.

What Specific Height Does No Woman Want?

Based on postings on a web site for tall women, there is one specific height in particular that tall women hate to high heaven.
You’d think that really tall women would hate being really tall. This tall women site has a “tall quotes” page filled with hundreds of postings by tall women. Some relish their height. Other tall women cry over their height daily.
The one height that tall women find the most unacceptable is…believe it or not…the height of five feet, ten inches !
This height is borderline tall, according to the site’s moderator, a man. This man refers to 5-10 as being “on the fringe.”
Yet almost every posting by a 5-10 tall woman reveals a woman totally despondent over this height: depressed, miserable, feeling hopeless. Is this bizarre or what?
And get this: Most ladies on the “tall quotes” pages who love and cherish their height are VERY tall, like 6-2 to 6-5 !
The moderator of the site theorizes that because 5-10 is almost in the normal range, the ladies who are this height feel more cheated and ripped off than women who are 6-3 or 6-4.
It’s almost as though the 5-10 woman feels she barely missed being “normal.” They barely missed the cut.
Because she is so close to the normal range, she identifies with it more, and can even slouch into that range.
Whereas a woman over six feet is so far removed from the borderline of the normal range, that such a woman will more readily decide to accept her height, and the acceptance eventually evolves into embracing it, loving it.
The very tall woman cannot slouch into the normal range.
They are too different, and realize it’s a lost cause to beat themselves up because they come nowhere near the fringe of that normal range. So these very tall women come to celebrate their height.
I never cease to be flabbergasted at the outpouring of grief that comes from 5-10 women. They speak as though they are freaks.
These women are only two inches taller than me! They claim people comment on their height all the time.
These women claim that even on a daily basis, someone asks how tall they are, if they play basketball, etc.
I can’t believe that this would be happening to me if I were only two inches taller.
I’ve experimented with this, standing on my toes while interacting with a bank teller behind the counter, who can’t possibly tell that I’m on my toes.
To this day, no bank teller has ever asked me my height.
It’s safe to assume that these 5-10 women never wear heels. Well, at 5-8, I wear 3-4 inch heels on some occasions.
I have 3-inch boots that I conceal with pants, so in these boots and pants, I can pass for a natural 5-10 or even 5-11.
I am still waiting for someone to ask me how tall I am or if I play basketball when I wear these heels.
I have 4-inch high heel pumps. I guess if I were the same height in slippers, people would make comments??
Yeah, you can see the height is fake when I wear high heel pumps and no pants to hide them.
But the boots and long pants…the heels are hidden, making me pass for a natural 5-10, but nobody has ever commented. Go figure.
So believe it or not, the height of 5-10 seems to be the height that’s hated the most by women.
Lorra Garrick has been covering medical, fitness and cybersecurity topics for many years, having written thousands of articles for print magazines and websites, including as a ghostwriter. She’s also a former ACE-certified personal trainer.
.
Top image: ©Lorra Garrick
Source: tallwomen.org

Are You a Woman at Least 5’10” Jealous of Taller Women?

There’s nothing wrong with being a very tall woman (at least 5-10) who’s envious of even taller women — even if you don’t play basketball or volleyball.
Yes, sometimes, a very tall woman would love to be even taller, even though it may have nothing to do with blocking shots in volleyball or basketball.
A man I know said his 5-11 wife is envious of taller women in the same room.
I’m 5-8 and I can relate to this because I always like being the tallest woman in the room. I like being the tallest woman in the gym, but sooner or later, a woman at least 5-10 appears.
And I’m jealous — not in a hostile way but in an envious way. But it’s not that unusual for a 5-8 woman to wish to be taller.
What about women 5-11 or 6-1 who don’t like their position of tallest in the room to be robbed by an even taller women? It can happen more often than you think.
Today at the gym, for some mysterious reason, there was a slew of women at least 5-9 or 5-10.
I just couldn’t believe how many tall women were in the building at the same time.
They all seemed to be between 5-9 and six feet. Had a 6-3 woman popped into the gym, I’m betting that a few of those 5-tenners or even six footers might have envied her.
Women do tend to envy women who have what they don’t have and can’t get.
The natural golden blonde might envy the natural flaxen blonde, but at least she could always mimic natural flaxen by dying her hair.
But natural height can’t be mimicked. Tall women who wear high heels would probably like to have a few more natural inches so that they’d be as tall in athletic shoes or more comfortable flat shoes as they are in high heels.
When I was a kid, the teacher often had us line up according to height.
Kids fought over who was taller and tried to stand at the tall end of the line, even though they were a little shorter than a few kids before them in the line.
The teacher would make the one particular kid get in the correct position, and that kid was never happy about that, always with a sour pouty face.
I never saw this jockeying for position occur at the short end of the line. No kids ever bickered who was shorter. I never heard, “I’M shorter!” or, “I’M shorter than you, na-na-na-naaaahh-nahhhhhh!”
Instead, it was always, “I’M taller, not you!”
Lorra Garrick has been covering medical, fitness and cybersecurity topics for many years, having written thousands of articles for print magazines and websites, including as a ghostwriter. She’s also a former ACE-certified personal trainer.
.
Top image: Shutterstock/ Antonio Guillem

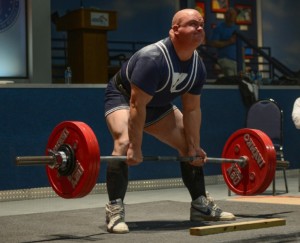
Are Tall People Stronger Than Short People?

So, are tall people really stronger than short people?
Ever wonder if it’s really true that tall people are stronger than short people?
A lot of folks think so, including Hollywood. Ever notice that the thug who intimidates someone in a sitcom or even a serious movie is almost always taller?
The implication is that tall people are stronger and/or better fighters than short folks.
Between training men and women of all heights, and having worked out at many health clubs over the years, I have observed men and women of all heights lifting weights.
Guess what, folks: Being tall or short has no bearing on how much weight can be lifted: pressed outward, pulled inward, hoisted off the floor or carried around.
I wrote another article about strength and pointed out that a big tall woman isn’t necessarily more efficient at fighting off a man than is a smaller woman.
A reader posted a comment asking why the heavier, taller woman wouldn’t have an advantage.
Actually, she would, from the perspective of a man trying to knock her to the ground or pick her up and drag her.
It would be easier for a man to knock a shorter, lighter woman to the ground or pick her up. Also, height is worthless if you can’t throw a punch.

But I’m talking about sheer strength and power here.
As a former personal trainer, I’ve had short men and women lifting the same amount of weight as my tall clients: deadlift, any type of squat, leg press, bench press, overhead press, dumbbell curl, you name it.
Furthermore, every time I see a man at the gym bench pressing some godly amount, he tends to be on the short side.
In fact, there is a man at one of the chain clubs I work out at, who can bench press over 400 pounds. This man can’t be taller than 5-5.
Though a six foot tall woman isn’t necessarily stronger than a 5-3 woman (if she is stronger, in terms of absolute power, it has nothing to do with height) — the tall woman actually does have an advantage in certain situations.
Being six feet tall will not give this woman an advantage over a short woman in picking up a 30 pound sack of dog food from the floor.
However, what if both women are told to place that 30 pound bag on a shelf that’s 5’9” high?
The tall woman can place the heavy bag on the shelf without raising her elbows above her shoulders.
However, the short woman must raise her arms considerably above her shoulders to get the bag on the shelf.
Because she is shorter, she must perform a greater range of motion to make the reach, placing more stress on the shoulders – and this requires greater effort, more exertion, and hence, the task will be more difficult for her.
But this doesn’t mean she is physically weaker than the tall woman. In fact, the short gal may very well be stronger than her much taller friend.
Let’s see how well the taller woman does at hoisting a 30 pound bag atop a shelf that’s six inches above her head; for all we know, she may not even be able to do it.
- This task is not a test of absolute strength.
- It’s a task of efficiency; the shelf height forces the short woman to raise the bag much higher, relative to her shoulders.
When you think about it, there really isn’t any reason why a tall person should be stronger than a short person, as far as how much weight he or she can lift and push.
My short clients could biceps curl as much as my statuesque clients. My very tall clients struggled as much with pushups as did my short clients.
Tall people at gyms don’t bench press more than short people. A 6’2” man won’t leg press more weight than a 5’7” man simply because his legs are longer.
In summary, short people and tall people, when considered as part of the general population, have the same absolute strength.
The difficulty of a task isn’t always determined by raw muscle power, but rather, some relative extraneous variable that forces the short person to engage in a wider range of motion – which requires more effort.
The reverse may also apply to a person with very long legs or arms. For example, it will be more challenging for a very tall person to get out of a tiny car when compared to a short person.
Lorra Garrick is a former personal trainer certified by the American Council on Exercise. At Bally Total Fitness she trained clients of all ages for fat loss, muscle building, fitness and improved health.

Six Very Tall Women Explain Why They Love High Heels

Tall women and high heels go as wonderful together as do chocolate chip cookies and milk.
Believe it or not, some tall women who love wearing high heels used to hate high heels.
And then one day, they had an awakening and realized just how glam high heels make a tall woman look! Every woman deserves to feel sexy, and this includes tall women!
Critics will argue that high heels ruin feet. But my point is this: Women are always going to be wearing high heels. Tall women should be part of this fashion demographic as much as shorter women.
Avoid high heels if they hurt your feet, but NOT because OTHER people think you’re too tall to wear them! YOU are more important than someone else with a negative opinion of tall people.
If you’re a tall woman struggling to accept your height, then you can start by ignoring negative people and flaunting your height with high heels!
My mother always made sure that I stood up straight and was proud of my height.
Once when I was 14 years old (and 5-9) she took me shoe shopping. As we browsed the section with heels, I commented that I liked heels, but they make me too tall.
She nearly knocked me out and declared (at the top of her voice) that I could never be too tall and that everyone else is just too short!
We then spent the next 30 minutes trying on heels, and the smile on my mother’s face as I wobbled around the store in my first pair of heels was priceless!
-Che’von Slaughter, 5-11, 23, public relations, Los Angeles
I think the biggest turning point came when I broke up with a guy that was just my height.
I never wore heels when I was with him because I didn’t feel comfortable, but then I started dating and not really caring if I was taller or as tall as the guys I was going out with, and it made me realize how much I absolutely love wearing heels.
-Kate Rickard, 5-11, PR professional, New York City
I used to avoid wearing high heels for fear of towering over everyone in my presence. With age, I became more confident with myself. I thought, if other women look great in heels, won’t I?
– Katie Tsilimos, 24, 5-11, recruiter for a recruitment firm, Chicago
If you feel too tall to wear high heels, do this: Shop the Internet for the coolest or sexiest high heel shoes, and while you do so, forget about your height.
Make your shoe selection based entirely on what you see on the web site. If you prefer to look at shoes in person, do that instead. But again, don’t think about your height. Focus ON THE SHOE.
Then do it. BUY the shoes! Just do it. You can always return them. When the shoes arrive by mail order, or once you get home from the store with them, put them on with an outfit that suits them.
Take a few deep breaths and just do it: Go someplace where there are people. Tell yourself your bank account will grow by $10 every time someone stares at you. Stay out for 10 minutes.
Every day, repeat, and add on five minutes. At the end of these sessions, tell yourself, “I look hot!” Hating your height is a learned behavior. IT CAN BE UNLEARNED.
Lorra Garrick has been covering medical, fitness and cybersecurity topics for many years, having written thousands of articles for print magazines and websites, including as a ghostwriter. She’s also a former ACE-certified personal trainer.

Should Tall Women Wear High Heels to Please Their Husband?

What should reluctant tall women do when their husbands want them to wear high heels, even if it means the woman will be taller than her husband?
Is this akin to a man wanting his full-figured wife to wear skimpy lingerie?
I recently received an e-mail from a 6-1 tall woman who was repeatedly having spats with her husband (also 6-1) over high heels.
He keeps wanting her to wear three-inch high heels, and this tall woman absolutely refuses.
But she’s been compromising with two-inch heels. This doesn’t satisfy her husband. So what’s going on with her husband?
If you ask tall women who hate their height, hate wearing high heels, and always wish they were much shorter so they could feel “normal,” and “blend in,” I bet most would say that this man is being cruel.
They’d insist that such a man is adamant about his wife wearing high heels as a way to exert control.
Or maybe he just has a mean streak and he likes to hurt his wife’s feelings. I bet many tall women in this group would consider this man an insensitive clod, a total jerk.
Now, what kind of response would you get from the other group of tall women: those who love being tall, enjoy wearing high heels, love the attention, walk tall and proud, and wouldn’t trade their height for anything?
Their responses would be entirely different, I’m sure.
For instance, this second, confident group of tall women would praise the man for admiring his wife’s height, for loving it so much that he wants to see more of it with high heels, that he gets a kick out of it and is proud to show her off.
Or, according to this second group of tall women, this man is simply being the typical man, not at all insensitive, but simply expressing his desire to see a sexy pair of legs in a sexy pair of high heeled shoes.
High heels do turn on some men, and he’s probably one of them.
A third reason could be that he’s simply trying to build his wife’s self-confidence about her height.
Maybe he figures that once she wears three-inch high heels, there will be a breakthrough and she’ll, from that point on, embrace her height.
The second group of tall women would praise this man because he relishes his wife’s height, rather than the type of man who feels like “less of a man” if he’s with a woman who’s taller. This 6-1 woman should thank her lucky stars.
So what’s the verdict? Should tall women like this 6-1 woman wear high heels only because the husband desires it? Well, she’s already compromised with the two-inchers.
On the other hand, is it really a hardship to add just one more inch? Perhaps she could do this, but then confine wearing the high heels around the house.
If the husband insists they go out in public, then it’s clear he wants to show off his wife. The woman didn’t tell me why her husband wants the three-inchers.
But perhaps the husband’s reasoning is similar to a parent insisting that their child jump off the high dive once and for all.
We all know that once a person jumps off that high dive, a new level of self-assuredness instantly kicks in. Maybe this is what the husband has in mind.
On the other hand, it could be that he simply finds tall women beautiful; the taller, the better!
Lorra Garrick has been covering medical, fitness and cybersecurity topics for many years, having written thousands of articles for print magazines and websites, including as a ghostwriter. She’s also a former ACE-certified personal trainer.
.
Top image: Freepik.com
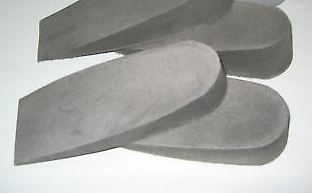
Why Wearing Shoe Lifts Doesn’t Mean You’re Insecure or Vain
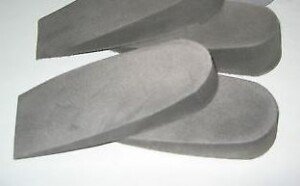
Wearing shoe lifts to look taller doesn’t mean you’re any more insecure than if you wore fake fingernails, clipped in a hair extension, or if you’re a man, put on some cologne or a hair piece.
So if you’re thinking of adding shoe lifts to your shoes to appear taller, then do it!
A woman may want to look taller without advertising it; a naturally taller look that is hidden inside her shoes in the form of shoe lifts. I’m 5-8 naturally, but people think I’m naturally taller because I wear one-inch shoe lifts in my athletic shoes.
These shoe lifts easily slip in and nobody knows they’re there. Several companies offer shoe lifts online.
Insecurity is not the issue.
Wanting to appear taller is. Just like some women want their fingernails to look longer and hence have fake tips applied, or their hair to appear longer and hence put in extensions. And they add length to their eyelashes, too!
The insecurity issue, however, seems to come up more commonly among men who want to appear taller.
Certainly, there are naturally six-foot men who actually wear one-inch shoe inserts. This isn’t insecurity any more than it is when he decides to wear a certain tie or grow a beard.
A man who stands 5-7 might want to wear shoe lifts — not so much because he feels insecure but to give him a little edge in the business world.
Shoe Lift Guide
First off, know that gel inserts might get confiscated during security checks at the airport — if you can believe that. It happened to me. The gel is sturdy, not like putty, but TSA went overboard.
The inserts should not be wooden-hard, yet not so soft that your body weight squishes them. You want the full effect of the shoe lift.
They come in different varieties such as for dress shoes, or three-quarter-length versus just big enough for the heel to make contact with.
I have found that shoe lifts higher than one and a quarter inch are not practical, because these will force the foot up so high, that the shoe will probably slip off when you’re walking.
Further, it will look like your foot isn’t all the way in the shoe. An observer, then, might suspect you have lifts, and the whole idea behind these is to look naturally taller, not artificially taller.
Even if you have long pants that will conceal this, consider the visibility when you sit down and your pants lift up.
And if nobody will see your feet when you’re seated, keep in mind that one and a HALF inch lifts will make it very easy for your shoes to slip off while walking.
Another thing to consider is if you’re wearing lifts at least one inch, this forces the top of the foot to press against the underside of the shoe tongue.
So if you’re seated and immobile for an extended period, this extra pressure could result in the top of the foot falling asleep or getting numb and tingly.
This is what happens with my one-inch lifts that are in my dress boots. If I’m seated, the top of my foot presses against the underside of the “tongue” area of the boot. It isn’t long before this gets uncomfortable.
Do not have shame in getting shoe lifts. This way to lengthen your apparent height, as far as an insecurity issue, is no different than applying lipstick to make one’s lips appear longer.
Lorra Garrick has been covering medical, fitness and cybersecurity topics for many years, having written thousands of articles for print magazines and websites, including as a ghostwriter. She’s also a former ACE-certified personal trainer.

5 Smart Dating Tips for Tall Women

First of all, ask yourself what kind of shoes you’d wear with that dynamite outfit if you were shorter.
Then, go buy yourself those shoes and wear them, even if you’re 6-2. That’s dating tip # 1 for tall women.
What tall women have to realize, when it comes to dating, is that they have an extraordinary advantage. They have an edge.
And once she realizes what this edge is, then she will be much more self-confident when it comes to meeting the opposite sex. And that’s dating tip #2 for tall women:
Realize that your height will help you quickly filter through all the frogs out there.
If men are intimidated by your height, then this is not the kind of guy you’d want to get involved with. You learn this quickly because he sees your height immediately.
But shorter women, whom these men are more attracted to, must waste time getting to know these men over a period of time before finally realizing that they’re shallow in character.
The tall woman finds this out immediately; the shorter lady winds up going on many dates before finding out.
If you had average height, would you be attracted to a fellow who’s intimidated by tall women? I don’t think so.
Dating tip #3 for tall women: Practice good posture. Slumping and slouching are real turn-offs and give off signs that you lack self-assuredness.
Just as you’d be turned off by a man who exudes lack of confidence and a lot of self-doubt, the same is true in reverse: Men are put off by slouching women who feel awkward about their bodies.
Dating tip #4 for tall women: You can boost self-confidence by memorizing some clever responses to throw at men who might say rude things to you about your height.
If a man questions why you’re wearing heels, tell him: “So I can see that bald spot on the top of your head,” or, “So I can make you realize how short you are.”
If a man asks you if you ever get mistaken for a man, tell him, “No. Do you?”
If a man asks how you got to be so tall, say, “My parents watered me every day when I was a child.”
Dating tip # 5 for tall women: It helps to realize that there’s another reason why some men are not interested in women of height — they just aren’t interested, that’s all.
They may also not be interested in blondes or women with straight hair, for that matter. Or short women. Or skinny gals.
Just like you yourself have physical requirements, such as you might be turned off by men who are too muscular, bearded, bald, geeky looking, potbellied, ded, etc.
Don’t take it personally if a man doesn’t care for tall ladies. This doesn’t mean something is wrong with you.
Think of how silly it would be if that bald skinny man thought something was wrong with him just because you’re not attracted to bald skinny guys.
If you’re a tall woman, review these dating tips and put them to work.


