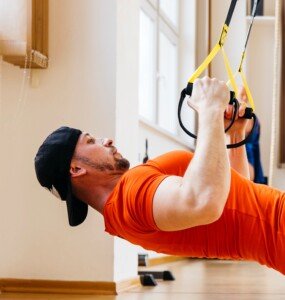
The inverted row is a fabulous compound exercise for which there’s many ways to increase intensity.
It seems as though the inverted row is the exercise that, when someone finally decides to include it in their program, nobody wants to be progressive with it.
What is an inverted row?
This compound movement also goes by the names reverse row and modified pull-up.
The trainee typically starts with feet on the floor and body at an angle, which can range from 45 degrees to just above parallel to the floor.
The trainee grabs a bar (or suspension straps) and hangs straight-armed, keeping their tilted body as straight as a plank (or at least, they should), and pulls chest towards the bar or straps.
Intensity is increased the closer the body gets to parallel to the floor in the starting position (arms hanging straight).
In order to get the body closer to parallel, you must prop feet up on a stool or bench.
Before I elaborate on how to further increase intensity, it’s important to first explain correct form, because often, people do this exercise with poor form.
I have seen people arching their backs as they pull themselves up; this mistake seems to be more common when someone uses suspension equipment, because the suspension straps can move in space, unlike a bar.
This back-bending is more likely to occur if one keeps their feet flat on the floor. With a heels-only approach, the trainee can keep their legs straight—their entire body plank-straight.
However, for de-conditioned individuals, they’ll have to keep their feet flat on the floor and flex their knees, unless they set the bar or straps high enough to increase their starting angle enough so that they can do the exercise off their heels with straighter legs.
With suspension straps, it’s a matter of positioning appropriately, relative to how far off the ground one is hanging, to find an angle suitable enough to allow for a straight-body pull.
Personal trainers often have beginning clients perform a very high-angled inverted row with suspension equipment.
If the trainee can manage around 10 good repetitions, it’s time to reposition the straps to lessen the angle for more resistance, and the goal should be to get the trainee to a heels-on-floor start position.
Sometimes, suspension equipment can be awkward, and a personal trainer should consider alternating the client’s inverted rows between this equipment and a Smith machine bar. Another option is an Olympic bar situated on the pegs of a squat rack.
But realize that with suspension straps, you can work through a greater range of motion at the top of the movement.
Figure out the angle that allows you to execute this exercise with as close to a planked body as possible. Even the weakest person can do an inverted row if the angle is high enough.
Why is a planked body so important?
Because the inverted row is supposed to be an upper body exercise, not a leg and glutes exercise. The inverted row is the most effective pulling exercise in the horizontal plane.
The second reason is because this is how the core gets engaged—big-time. Inverted rows really work the abs!
Intensity techniques
Decline. A declined starting position (body past parallel) further increases intensity, but this doesn’t mean that as people adapt to this, they should keep steepening the decline to the point where they’re almost upside down.
Past a certain point, the muscle recruitment will shift away from the targeted muscles, which are the same ones you want to target with a standard pull-up or other rowing movements.
When the decline is too steep, you’ll will feel awkward and it may even be easier than the previous, lesser decline.
Limit the decline to the angle that’s created if one were to prop feet up on an 18 inch stool.
The goal is 8-10 reps, pulling up as high as possible for each rep, then going down to a dead hang before pulling back up again.
Don’t increase the decline any more than with the 18 inch stool.
Resistance. Wedge a 5 lb. dumbbell between thighs. Over time, increase dumbbell weight.
Hand grip. Palms can be forward or facing you when using a bar. With suspension straps, one can use a neutral grip (palms facing each other).
Hand placement. A wider grip will make the motion harder.
One hand. This is the ultimate way to increase intensity. It will also deliver a wicked hit to the obliques. Keep reading…
Get in position under a bar. Begin with the left hand; place left hand closer towards the centerline above yourself than it normally would be, because you’ll be pulling with that hand, while the other hand is free in the air.
You pull up with the left arm/hand, and simultaneously twists or rotates body to the left, so that in the top position (when you’ve pulled yourself up), the right hip is below the bar, and left hip is rotated close to the floor.
What did the free right arm do meanwhile? It was extended and reaching across the torso as though the right hand was trying to reach for a gun in a hip holster.
Legs need to bend but only as much as necessary. The heel-on-floor rule gets tossed out.
The one-arm inverted row can also be done one side at a time. The one-armed style should be done with feet on the floor, never elevated. Intensity matters!