You can make the hamstring curl machine (prone and seated) create killer hams by making a few changes.
The quads get all the spotlight because we can easily see the front of our legs.
Many tend to neglect the hamstrings because they’re behind and not visible.
There are a few tricks that will create the most effective use of the seated or prone hamstring curl apparatus — yielding your best hams possible.
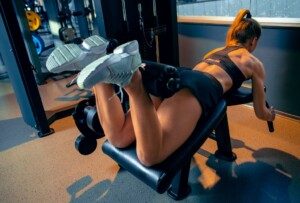
The first exercise to look at is the prone hamstring curl: lying chest down on a bench.
Avoid the Butt Bounce
Most users of prone hamstring equipment, if not 99 percent, won’t bring the pad or roller in tight contact with their buttocks.
And if they do, it’s often jerked up and makes contact for only a fraction of a second before being quickly released.
You should bring the pad or roller into sustained contact with your glutes — squeezing it there for two solid seconds before releasing.
Many people find this difficult to do. Instead, they end up bouncing the pad off their butt and holding it five inches away from their butt, rather than literally right up against it for a solid squeeze-hold.
Freepik.com/master1305
Many people bring the pad up to only within several inches of their butt before lowering it.
Some don’t even touch their butt; the top of every single rep is several inches away.
To optimize muscle fiber recruitment, you must employ full range of motion, and the butt-squeeze ensures this. The two-second hold also increases time under tension.
The butt-squeeze should be done by both men and women.
If you can’t do it throughout the set, then the resistance is too heavy. You’ll need to experiment with a lighter load to see which one allows the new protocol, yet at the same time, fulfills an 8-12 RM.
The squeeze at the apex of the movement will induce intense time under tension to the muscle fibers, inciting growth and strength.
And the more you work out this way, the more rock-hard in appearance your hamstrings will become.
Avoid the Chest Lift
Avoid lifting your chest off the bench when you let the weight down (the release). If you can’t keep your chest flat on the bench, the load is too heavy.
Rocking upward with each release or negative reduces the isolation effect.
To maximize hamstring engagement, you must maximize the isolation.
Keep your chest glued to the bench as you lower the pad. You’ll feel a big difference in your hamstrings if you’re used to lifting up your chest.
Sets: 5. Reps: 15 for beginners but not a rep-max to avoid cramping; 8-12 RM for intermediate and advanced.
Note: If you want rock-hard hams, you must push your limits once your hamstrings develop some toughening. Those last few butt squeezes should HURT.
People who are new to hamstring curls should spend several weeks working at light to medium intensity to avoid cramping.
Beginners who jump right into an intense routine will risk a sudden and very painful cramp.
Perhaps more popular than lying down is the seated hamstring curl.
Avoid the Foot Flop; Squeeze into the Equipment
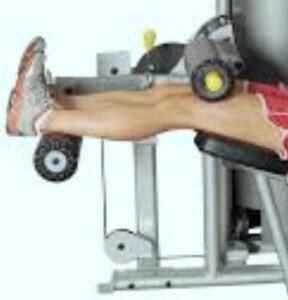
Position the pad securely atop your thighs to encourage maximum isolation of the muscles.
Your feet must be kept in a rigid, 90-degree angle to your shins at all times; no foot flopping.
Set the weight light enough so that your legs can curl in as far as the equipment will allow.
Most people fail to curl their legs in all the way and, in fact, often flex to only 75% of the full range of motion.
This usually means the weight is too heavy, but it could also be because inexperienced users don’t realize how incomplete their flexion is, or, experienced users underestimate the value of a complete ROM.
The back of the calves should make contact with the equipment. In other words, the only thing that should end the flexion is that of coming in contact with the equipment.
If you’re unable to do this without jerking your body, use lighter weight.
Your calves should squeeze against the equipment (maximum ROM) for two seconds for the same reason as the butt-squeeze described previously.
This should then be followed by a controlled release. Many people let the weight fly right back up, denying optimal negative or eccentric muscle contraction.
Extra Tip
People typically lean back when using this equipment, clutching the handles on top of the thigh pad.
Though there’s nothing wrong with this approach, there’s another approach that will further isolate the hamstrings.
And that is to maintain a forward lean throughout the set. When you do this, you’ll immediately feel the difference.
Needless to say, it’s more difficult and will require a lighter weight load.
Sets: 5. Reps: 15 for beginners at very light weight but no rep max to avoid cramping; 8-12 RM for intermediate/advanced.
Don’t make the mistake of assuming that a lighter load means less efficacy or fewer hypertrophy gains.
When a lighter load is combined with these changes in body position, the result will be stronger, shapelier, more sculpted muscles.
Avoid this Cheat Move
For either type of equipment, don’t allow the weight stack to come in contact with the rest of the stack before the next rep.
Otherwise, this will cause a momentary break in muscle tension, even if it’s a tap-and-go approach.
Just tapping the stack may encourage eventually letting it rest there for some repetitions.
To optimize time under tension you should lower the moving stack to within one inch or less of the rest of the stack.
Burning Sore Hamstrings
Depending on a person’s conditioning, effort level and tolerance of muscle “burn,” the legs may be very sore 2-3 days later, or even the next day.
Over time, however, your muscles will adapt; delayed soreness will be reduced.
However, there’s something you should never do to combat more pronounced soreness: convalesce.
Resting too much will encourage more stiffness and soreness.
In other words, on the day of marked soreness, it would be far better for your hamstrings to pedal a stationary bike, elliptical machine or walk on a treadmill or even an easy jog outside at light effort than to just sit around to “treat” the discomfort.
When you have to sit, such as when using a computer, then sit. But don’t sit when you can walk around, such as when talking on your phone or watching TV.
Final Points
This 10-set routine, when done with maximal effort, can be done once a week for amazing results.
The effort level for beginners should be light to moderate, not intense, to give their muscles a chance to acclimate without risking a cramp.
However, the rep range for intermediate/advanced should be grueling, with difficulty kicking in within the first several reps.
Rest times in between sets may vary from 60 to 75 seconds. An occasional 90 seconds to ensure the squeeze is perfectly fine.
 Lorra Garrick is a former personal trainer certified by the American Council on Exercise. At Bally Total Fitness she trained clients of all ages for fat loss, muscle building, fitness and improved health.
.